slope of a first degree function
Points as Check Box
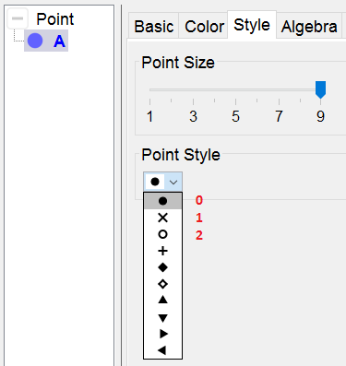
Points are well fitted to be used as Check Boxes since you can define its style and its color in a script.[br]There are 10 different Point Styles, numbered from 0 to 9. We'll use[br][list][*]an empty point [b](Point Style = 2)[/b] for an unchecked option[/*][*]a full point [b](Point Style = 0)[/b] for a checked option[/*][/list]When a checked option, represented by a point A, is correct, we'll color it green, when it's wrong we'll color it red, using the commands [b]SetColor[A, "green"][/b] and [b]SetColor[A, "red"][/b].

slope of a first degree function
The graph of a first degree function kan be ascending, descending or none of both. In next applet you have to select the correct option. See how it works and make it yourself, following the construction steps.
Try it yourself...
Construction Steps
[table][tr][td]1-2[/td][td][/td][td]Create the numbers a and b with the command [b]RandomBetween[-4, 4][/b].[/td][/tr][tr][td]3[/td][td][/td][td]Define a function f as [b]f(x) = Polynomial[a x + b][/b].[br]Note: The command Polynomial[] prevents the equation to be displayed as e.g. 1x + 2.[/td][/tr][tr][td]4-6[/td][td][icon]/images/ggb/toolbar/mode_point.png[/icon][/td][td]Select the [b]Point Tool[/b] and click three times in the Graphics to create the points A, B and C.[/td][/tr][tr][td]7-9[/td][td][icon]/images/ggb/toolbar/mode_text.png[/icon][/td][td]Select the Text Tool and create the texts [b]is ascending[/b], [b]is descending[/b] and [b]none of both[/b].[br]Align these three texts to the points A, B and C.[/td][/tr][tr][td]10[/td][td][/td][td]Type the command [b]ans = 0[/b] to create a variable number ans.[/td][/tr][tr][td]11[/td][td][/td][td]Type the command [b]sol = [/b][b]If [a > 0, 1, If[a < 0, 2, 3]][/b] to define the number sol.[br]The value of sol is defined in a nested condition so that:[br]- if a > 0 sol = 1[br]- if a < 0 sol = 2[br]- if a = 0 sol = 3[/td][/tr][tr][td]12[/td][td][icon]/images/ggb/toolbar/mode_buttonaction.png[/icon][/td][td]Select the [b]Button Tool[/b] and create a button with capition [b]new exercise[/b] and scripting commands[br][b]UpdateConstruction[] [/b] to recalculate the Random numbers[br][b]SetValue[ans,0] [/b] to set the value of ans back to its initial value 0[br][b]SetPointStyle[A, 2] [/b] to uncheck the points A, B and C[br][b]SetPointStyle[B, 2][br]SetPointStyle[C, 2][/b][br][b]SetColor[A, "blue"][/b] to set the color of the points A, B and C to blue[br][b]SetColor[B, "blue"][br]SetColor[C, "blue"][/b][br][/td][/tr][tr][td]13[/td][td][icon]/images/ggb/toolbar/mode_text.png[/icon][/td][td]Select the [b]Text Tool[/b] and type the dynamic text selecting f in the list of available objects.[/td][/tr][/table]
Scrips of the points
For checking and controlling the answer we add a script to each of the three points:[br][list][*]By clicking on A ans gets the value 1, by clicking on B ans = 2 and by clicking on C ans = 3.[/*][*]When selecting one of the three points, it gets Point Style 0 (= full) the other two must be unchecked getting Point Style 2( = empty) and colored blue.[/*][*]When making a good selection the selected point colors green if wrong it colors red.[/*][/list]Rightclick on the points and type in the Tab On Click of Scripting these scripts:

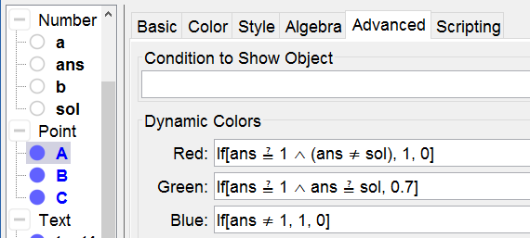
the answer is controlled by dynamic coloring of the points. Here's shown how to work for point A.[br]Now it's not hard to figure out how to do for B and C (with the corresponding values of ans).
