Learn Geometry

Welcome to the [url=https://www.geogebra.org/geometry]GeoGebra Geometry App[/url]! Learn how to create polygons, visualize transformations, format your constructions, and much more with this collection of video tutorials and applets.
Table of Contents
- First Steps
- Comparison of GeoGebra Math Apps
- Introduction
- Explore the app
- Algebra View
- Tools View
- Graphics View
- Basic
- Parallelogram
- Rhombus
- Isosceles triangle
- ASA triangle
- Incircle of a triangle
- Central and inscribed angles
- Transformations
- Advanced
- Concept of congruence
- Geoboard and automatic feedback
- Animating conics
- The Wallace-Simson line
- YouTube tutorials
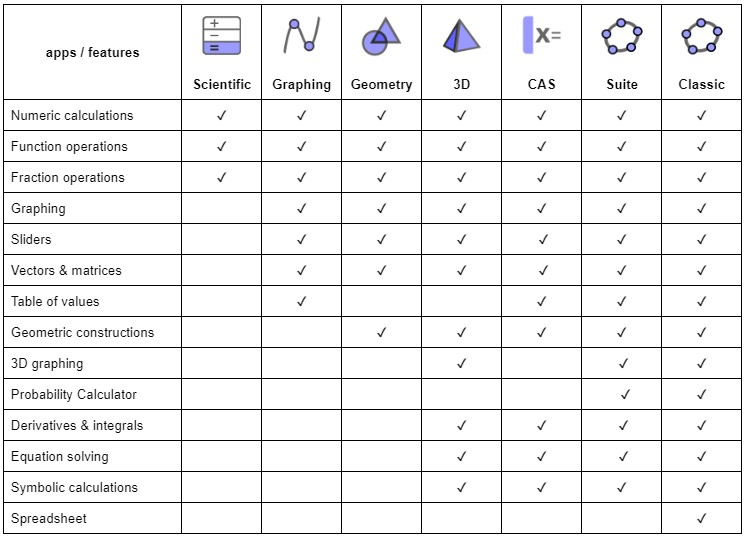
Comparison of GeoGebra Math Apps
With our [i]GeoGebra[/i] math apps you can explore and learn functions, geometry, algebra, statistics and 3D in new and interactive ways.[br][list][*][url=http://www.geogebra.org/scientific]Scientific Calculator[/url][br][/*][*][url=https://www.geogebra.org/graphing]Graphing Calculator[/url][br][/*][*][url=https://www.geogebra.org/geometry]Geometry[/url][br][/*][*][url=https://www.geogebra.org/calculator]Calculator Suite[/url][/*][*][url=https://www.geogebra.org/cas]CAS Calculator[/url][br][/*][*][url=https://www.geogebra.org/3d]3D Calculator[/url][/*][*][url=https://www.geogebra.org/classic]GeoGebra Classic[/url][br][/*][/list]The right app for you is the one that meets your own needs and, if used in tests, fulfills exam regulations of your region. The following table gives an overview of which features are available in which apps.
GeoGebra in Exams
We believe that students benefit from using the exact same GeoGebra app in class, for homework and during tests. This way, they will get the most practice with the app and therefore be able to make the best use of our technology in all situations. That's why we have created our [url=https://www.geogebra.org/m/y3aufmy8]GeoGebra Exam Mode[/url] and added it within each one of our apps. The exam mode locks down mobile devices so students cannot communicate or use any other apps than GeoGebra during a test. This approach has already been field-tested and approved by several ministries of education in several regions. Read more about how to use [url=https://www.geogebra.org/m/y3aufmy8]GeoGebra in exams[/url].[br][br]
Parallelogram
Task
Create a parallelogram and change it by dragging the vertices of the figure. Explore how the values of the sides and angles are changing. [br][br]Explore the construction and learn how to discover properties of parallelograms with [url=https://www.geogebra.org/geometry]GeoGebra Geometry[/url]. Then try it yourself by following the instructions below.[br]
Explore the construction...
Instructions
[b]Note:[/b] If you're using the Mobile App make sure that the chosen [i]Labeling[/i] option is [i]New Points Only[/i]. You can change this by going to the [i]Settings [/i]in the app's menu and then selecting [i]General.[/i][br][br][table][tr][td]1.[/td][td][icon]https://www.geogebra.org/images/ggb/toolbar/mode_join.png[/icon][/td][td]Select the [i]Line[/i] tool and create a line [i]AB[/i] by clicking twice in the [i]Graphics View[/i].[/td][/tr][tr][td]2.[/td][td][icon]https://www.geogebra.org/images/ggb/toolbar/mode_join.png[/icon][/td][td]Create a line [i]BC[/i] using the [i]Line[/i] tool again.[br][b]Hint:[/b] Select point [i]B[/i] and then click in the [i]Graphics View[/i] to create point [i]C[/i].[/td][/tr][tr][td]3.[/td][td][icon]https://www.geogebra.org/images/ggb/toolbar/mode_parallel.png[/icon][/td][td]Activate the [i]Parallel Line[/i] tool and create a parallel line to line [i]AB[/i] through point [i]C[/i].[br][b]Hint:[/b] Select the line [i]AB[/i] and then point [i]C[/i].[/td][/tr][tr][td]4.[/td][td][icon]https://www.geogebra.org/images/ggb/toolbar/mode_parallel.png[/icon][/td][td]Create a parallel line to line [i]BC[/i] through point [i]A[/i] using the [i]Parallel Line[/i] tool again.[/td][/tr][tr][td]5.[/td][td][icon]https://www.geogebra.org/images/ggb/toolbar/mode_intersect.png[/icon][/td][td]Select the [i]Intersect[/i] tool and create the intersection point [i]D[/i] of the two lines.[br][b]Hint:[/b] Click directly on the intersection point.[/td][/tr][tr][td]6.[/td][td][icon]https://www.geogebra.org/images/ggb/toolbar/mode_polygon.png[/icon][/td][td]Activate the [i]Polygon[/i] tool and create the parallelogram [i]ABCD[/i] by successively selecting all the vertices.[br][b]Hint:[/b] To close your polygon, select the first point again.[/td][/tr][tr][td]7.[/td][td][icon]https://www.geogebra.org/images/ggb/toolbar/mode_showhideobject.png[/icon][/td][td]Select the [i]Show / Hide Object[/i] tool and hide the auxiliary lines by selecting the lines.[br][/td][/tr][tr][td]8.[/td][td][icon]https://www.geogebra.org/images/ggb/toolbar/mode_showhidelabel.png[/icon][/td][td]Select a segment using the [i]Move [/i]tool[i] [/i]and select [i]Show Value[/i]. Repeat this for all sides of the parallelogram.[br][b]Note:[/b] In the Mobile App select the [i]More [/i]button, then [i]Set caption style[/i] and select [i]Value[/i].[/td][/tr][tr][td]9.[/td][td][icon]https://www.geogebra.org/images/ggb/toolbar/mode_angle.png[/icon][/td][td]Display the values of the angles by selecting the [i]Angle[/i] tool and selecting the parallelogram.[/td][/tr][tr][td]10.[/td][td][icon]https://www.geogebra.org/images/ggb/toolbar/mode_move.png[/icon][/td][td]Select the [i]Move[/i] tool and explore the properties of your construction.[/td][/tr][/table]
Try it yourself...
Instructions (continued)
[table][tr][td]11.[/td][td][icon]https://www.geogebra.org/images/ggb/toolbar/mode_segment.png[/icon][/td][td]Construct the diagonals of the parallelogram using the [i]Segment[/i] tool. For the first diagonal select point [i]A [/i]and then point C[i] [/i]and for the second diagonal select point [i]B [/i]and then point [i]D[/i]. [/td][/tr][tr][td]12.[/td][td][icon]https://www.geogebra.org/images/ggb/toolbar/mode_intersect.png[/icon][/td][td]Create the intersection point of the diagonals using the [i]Intersect [/i]tool.[/td][/tr][tr][td]13.[/td][td][icon]https://www.geogebra.org/images/ggb/toolbar/mode_distance.png[/icon][/td][td]Select the [i]Distance or Length[/i] tool and select each segment of the vertices [i]A[/i], [i]B[/i], [i]C, [/i][i]D[/i] and the intersection point [i]E[/i] of the diagonals.[br][b]Hint:[/b][i] [/i]Select point [i]A[/i] and then point [i]E[/i]. Repeat this for points [i]B[/i], [i]C[/i] and [i]D[/i].[/td][/tr][tr][td]14.[/td][td][icon]https://www.geogebra.org/images/ggb/toolbar/mode_slope.png[/icon][/td][td]Select the [i]Slope [/i]tool and select all four sides of the parallelogram.[/td][/tr][tr][td]15.[/td][td][icon]https://www.geogebra.org/images/ggb/toolbar/mode_move.png[/icon][/td][td]Explore your construction using the [i]Move[/i] tool.[/td][/tr][/table]
Concept of congruence
Task
Create two triangles and check if both figures are congruent or not.[br][br]Explore the construction and learn how to check with [url=https://www.geogebra.org/geometry]GeoGebra Geometry[/url] if two figures are congruent or not. Then try it yourself by following the instructions below.
Explore the construction...
Instructions
[table][tr][td]1.[/td][td][img]https://wiki.geogebra.org/uploads/thumb/f/f1/Stylingbar_graphicsview_show_or_hide_the_grid.svg/32px-Stylingbar_graphicsview_show_or_hide_the_grid.svg.png[/img][/td][td]Open the [img]https://wiki.geogebra.org/uploads/thumb/d/d2/Ic_settings_black.svg/16px-Ic_settings_black.svg.png[/img] [i]Settings,[/i] select [i]Show Grid[/i] and choose [i]Major and Minor Gridlines.[/i][br][b]Note:[/b] In the Mobile App select [i]Grid Type[/i] before you can choose [i]Major and Minor Gridlines.[/i][/td][/tr][tr][td]2.[/td][td][icon]https://www.geogebra.org/images/ggb/toolbar/mode_polygon.png[/icon][/td][td]Create two triangles next to each other.[/td][/tr][tr][td]3.[/td][td][icon]https://www.geogebra.org/images/ggb/toolbar/mode_move.png[/icon][/td][td]Use the [i]Move[/i] tool to select one of the vertices and change its style.[/td][/tr][tr][td]4.[/td][td][icon]https://www.geogebra.org/images/ggb/toolbar/mode_copyvisualstyle.png[/icon][/td][td]Use the [i]Copy Visual Style[/i] tool to select the previously changed vertice and copy it's style to the other vertices by selecting them.[br][b]Hint:[/b] Choose the [i]Move[/i] tool to leave.[/td][/tr][tr][td]5.[/td][td][/td][td]Switch to the [i]Algebra View[/i].[br]Type [math]If[/math]([math]AreCongruent\left(t1,t2\right)[/math], [i]"Congruent", "Not congruent"[/i]) into the [i]Input Bar[/i] to check if the triangles are congruent. If they are congruent the shown text will be [i]Congruent.[/i][/td][/tr][tr][td]6.[/td][td][/td][td]Switch back to the [i]Tools View[/i].[/td][/tr][tr][td]7.[/td][td][icon]https://www.geogebra.org/images/ggb/toolbar/mode_move.png[/icon][/td][td]Change the style of the text.[br][/td][/tr][tr][td]8.[/td][td][icon]https://www.geogebra.org/images/ggb/toolbar/mode_move.png[/icon][/td][td]Move the corners to obtain two congruent triangles.[/td][/tr][/table][br][b]Note: [/b]If you're using the Online App or Desktop App you can do alternative steps instead of steps 6, 7 and 8:[br]First create the boolean value [i]congruent[/i] using the command [math]AreCongruent[/math][i].[/i] Type [math]congruent=AreCongruent\left(t1,t2\right)[/math] into the [i]Input Bar[/i].[br]Then switch back to the [i]Tools View [/i]and create a text. On the dialog select [i]Advanced [/i]and then [img]https://wiki.geogebra.org/uploads/thumb/4/4e/Geogebra-logo-elipse.svg/16px-Geogebra-logo-elipse.svg.png[/img] [i]GeoGebra[/i] and select the variable [i]congruent.[/i] Press [i]OK [/i]to confirm.