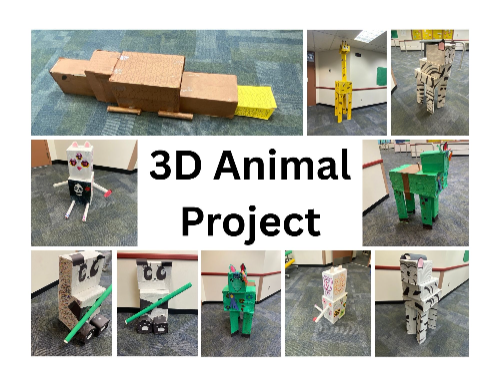
3D Animal Project

Complete each activity in this book to create your 3D animal model and IRL project.
Table of Contents
- Introduction to 3D - Building Blocks & Nets
- opening a cube
- Building Blocks Discovery
- Nets of 3D Objects (Cubes, Pyramids, Prisms, Cylinders)
- Surface Area and Volume
- Surface Area: Introductory Exercises
- Maximizing Surface Area: Open Middle Cube Problem (V2)
- Surface Area Formula for Prisms
- Surface Area Formula for Pyramids
- Volume of a Rectangular Prism
- Volume of Pyramid and Cube
- Rectangular Pyramid
- Square Pyramid: Underlying Anatomy
- 5.4 Volume/Surface Area Activity
- Modeling with AR
- 3D Modeling with AR: Part 1
- 3D Modeling with AR: Part 2
- 3D Modeling with AR: Part 3
- 3D Modeling with AR: Part 4
- 3D Modeling with AR: Part 5
- 3D Modeling with AR: Part 6
- 3D Modeling with AR: Part 7
- 3D Modeling with AR: Part 8
- 3D Modeling with AR: Part 9
- 3D Modeling with AR: Part 10 - Cereal Bowl Function Modeling!
- 3D Modeling with AR: Part 11 - Coffee Mug Modeling
- Creating Your Animal 3D Model
- 3D Animal Model
- Moving to IRL
- Exploring Scaled Figures Using Models
- IRL 3D Animal Project
opening a cube
A cube is divided into 6 congruent right pyramids. [br]Drag the yellow dot to 'close' the cube. [br]This shows the volume of a square base pyramid with height equal to half its base edge.
opening a cube
Surface Area: Introductory Exercises
Take a few minutes to interact with the rectangular prism shown here. After doing so, create one that has a length = 4 units, width = 5 units, and height = 3 units.
How many square units (i.e. "squares") appear on 1 [b][color=#ff00ff]pink face[/color][/b]? [br]How many square units (i.e. "squares") appear on 1 [b][color=#bf9000]gold face[/color][/b]? [br]How many square units (i.e. "squares") appear on 1 [b]white face[/b]?
Use your answers for (1) to determine the TOTAL SURFACE AREA of this rectangular prism. [br]That is, how many square units, or squares, cover the ENTIRE SURFACE of this rectangular prism?
Now create a rectangular prism that has a length = 8 units, width = 3 units, and height = 5 units.
How many square units (i.e. "squares") appear on 1 [b][color=#ff00ff]pink face[/color][/b]? [br]How many square units (i.e. "squares") appear on 1 [b][color=#bf9000]gold face[/color][/b]? [br]How many square units (i.e. "squares") appear on 1 [b]white face[/b]?
Use your answers for (3) to determine the TOTAL SURFACE AREA of this rectangular prism. [br]That is, how many square units, or squares, cover the ENTIRE SURFACE of this rectangular prism?
Overall, how we can determine the total surface area (number of squares) that cover the entire surface of a rectangular prism? Describe.
3D Modeling with AR: Part 1
Necessary app(s) installed already? If so, you can start at 2:51.
QUICK ACCESS TO TINY URL (0:56 - 1:22 in screencast)
[size=200][color=#0000ff][b][url=https://docs.google.com/document/d/1NQPwpMfxy9KlWHbpd3Fn7PF9zvn8TC5pEAwi59O_zdA/edit?usp=sharing]TINY URL LINK[/url][/b][/color][/size]
Math Teachers:
[size=150]Here is the first in a multi-part series re: [b][color=#1e84cc]Using GeoGebra 3D with Augmented Reality to actively engage students with 3D modeling[/color][/b]. [br][br][b]3D modeling is not "...just for the honors kids[/b]." Nor is it something older students should do if they decide to take Calculus 3 (Multivariable Calculus). [b]3D Modeling is for ALL STUDENTS. [/b] And GeoGebra 3D app provides a user-friendly platform on which they can do so. [br][br]And[b] AUGMENTED REALITY[/b] provides students with the means to test the ACCURACY of their models by virtually superimposing their constructions over 3D objects in their environment. [/size]
GOAL 1: Construct this prism in GeoGebra 3D & Test in AR
[size=150]The key with introducing students to modeling simple 3D solids is to choose an ideal position for one of its faces. And to do [i]this[/i], we need to choose convenient locations for 2 of the vertices. [br][br]Here's a general conversation I've had with many of my Ss in the past (re: this). [br][br][b]Me:[/b] "What's the easiest coordinate number to work with?" [br][b]Students:[/b] [Most reply either] "1" [or] "0". [br][b]Me:[/b] "Of those two, which is usually easier to work with?" [br][b]Students:[/b] "0". [br][b]Me:[/b] "Why"? [br][b]Students: [/b]"Makes doing algebra a lot easier".[br][br][b]Me:[/b] "Okay... well..., I want you to now build this prism in GeoGebra's 3D app [rectangular coordinate system that's shown] so that we maximize the number of times zero is used a coordinate." [br][br]And off they go. [br][br]There's 3 main ways students can position it so (0,0,0) is used as one corner (vertex). [br]One setup is shown below. [/size]
ONE POSSIBLE SETUP. What are the coordinates of its other 6 vertices?

Here's what this setup looks like after it's built in GeoGebra 3D
NOW TO EXPLORE IN AUGMENTED REALITY:
1) [size=150]Open up GeoGebra 3D app on your device. [br][br]2) Go to the MENU (horizontal bars) in the upper left corner. Select OPEN. [br] In the Search GeoGebra Resources input box, type [b][size=200]w34uzfby[/size][/b][br] (Note this is the resource ID = last 8 digits of the URL for this resource.)[br][br]3) Reposition this prism (if necessary) on your device. [br][br][/size]4) Tap the AR button (lower right). Hold your device to the floor. When the square appears, TAP it. [br] You can now explore this resource in Augmented Reality.
Quick AR Demo (Part 1)
3D Animal Model
GOAL
Create a 3D model of an animal of your choice. [br][br]Remember, the final IRL (in real life) product has to be able to be created out of materials we have available in class.
NOTICE AND WONDER
What do you notice about the animals in the photos? What do you wonder about these IRL animal creations?
STEP 1
Research and decide on an animal to create. [br][br]Keep in mind: [br]Your final IRL product must be at least 3 feet in one direction. [br]You must be able to create the IRL product from supplies available in class (or that you bring in this week). [br]You will have to find the volume and surface area of your final creation (both online and IRL). [br][br]Hints: [br]Use shapes we have studied this year in class. :)
Describe your chosen animal and why you selected it.
STEP 2
Using the skill you have learned from our exercises in GeoGebra, create the head of your animal. [br][br]Do not focus on details, just the major shapes. Be sure to use x, y, and z coordinates.
Describe the shapes you used for the head. Be sure to use mathematical descriptions.
STEP 3
Using the skill you have learned from our exercises in GeoGebra, create the body of your animal. [br][br]Do not focus on details, just the major shapes.
Describe the shapes you used for the body. Be sure to use mathematical descriptions.
STEP 4
Using the skill you have learned from our exercises in GeoGebra, create the appendages (arms & hands and legs & feet) of your animal. [br][br]Do not focus on details, just the major shapes.
Describe the shapes you used for the appendages. Be sure to use mathematical descriptions.
STEP 5 - The Final Product
Combine your individual parts to create your final 3D computer model of your animal. [br][br]You can use the export feature and import each image or recreate them in a single image. You may need to resize or move shapes.
Using the Area tool, calculate the Surface Area of your 3D model.
Prediction: [br][br]Using your knowledge of scale factors, make a prediction of the SURFACE AREA of your animal in real life (IRL) if each dimension is 10 times its current size.
Using the Volume tool, calculate the Volume of your 3D model.
Prediction: [br][br]Using your knowledge of scale factors, make a prediction of the VOLUME of your animal in real life (IRL) if each dimension is 10 times its current size.
STEP 6
How does your animal stand up? [br][br]Use Augmented Reality (AR) to see how your animal compares to those from previous years. Make adjustments as needed. [br][br]Take a screenshot of your 3D model next to an animal from a previous year. [br][br]Submit the photo on Canvas. This is your final grade for this part of the project.
Exploring Scaled Figures Using Models
Explore the relationship between scale factor and side lengths in this activity.
Putting It All Together
[i]Answer these open ended questions on your own or with others to form deeper math connections. [/i]
How can you use the scale factor to find the side lengths of a scaled copy?