Cónicas en 3D
Se dispone de un cono circular recto con radio de la base OA y altura OB.
Para modificar el radio del cono, arrastre el punto A[sub]R[/sub]. [br]Para modificar la altura, arrastre el punto B[sub]alt[/sub]. [br]Para rotar el cono, mueva el cursor sobre la pantalla activa.[br]Para reiniciar, haga clic en la esquina superior derecha. Se mostrará el icono de reinicicio.[br][br][b]Las curvas llamadas cónicas son lugares geométricos de puntos que cumplen ciertas propiedades en términos de la distancia. [/b][br]Las cónicas se clasifican en 4 tipos: parábola, circunferencia, elipse e hipérbola. [br]Las cónicas se obtienen de la intersección de un plano con un cono. El nombre aparece desde la antigua Grecia.
Utilice las casillas de control para mostrar una o más cónicas. Rote el cono para obtener una mejor visión de las figuras.
La posición del plano cortante que genera cada curva se puede modificar arrastrando el punto asociado a cada curva: parábola (C[sub]p[/sub]), circunferencia (P[sub]c[/sub]), hipérbola (K[sub]hip[/sub]). Para la elipse se disponen de dos puntos (G[sub]e1[/sub] y J[sub]e2[/sub]).[br][br]Al manipular la posición del plano cortante se pueden observar situaciones extremas. Por ejemplo:[br]- La parábola se convierte en una recta cuando el plano coincide con la generatriz del cono.[br]- La circunferencia se convierte en un punto cuando el plano pasa por el vértice del cono.[br]- La elipse se convierte en una circunferencia cuando el plano es perpendicular al eje de simetría del cono.[br]- La hipérbola se convierte en dos rectas cuando el plano pasa por el eje de simetría del cono.[br][br]Las cónicas corresponden a la representación gráfica de la ecuación polinómica de segundo grado [br][b]Ax[sup]2[/sup] + Bxy + Cy[sup]2[/sup] + Dx + Ey + F = 0[/b]
Poliedroak 3D-n
3D Modeling with AR: Part 1
Necessary app(s) installed already? If so, you can start at 2:51.
QUICK ACCESS TO TINY URL (0:56 - 1:22 in screencast)
[size=200][color=#0000ff][b][url=https://docs.google.com/document/d/1NQPwpMfxy9KlWHbpd3Fn7PF9zvn8TC5pEAwi59O_zdA/edit?usp=sharing]TINY URL LINK[/url][/b][/color][/size]
Math Teachers:
[size=150]Here is the first in a multi-part series re: [b][color=#1e84cc]Using GeoGebra 3D with Augmented Reality to actively engage students with 3D modeling[/color][/b]. [br][br][b]3D modeling is not "...just for the honors kids[/b]." Nor is it something older students should do if they decide to take Calculus 3 (Multivariable Calculus). [b]3D Modeling is for ALL STUDENTS. [/b] And GeoGebra 3D app provides a user-friendly platform on which they can do so. [br][br]And[b] AUGMENTED REALITY[/b] provides students with the means to test the ACCURACY of their models by virtually superimposing their constructions over 3D objects in their environment. [/size]
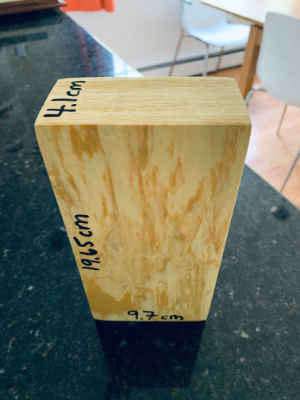
GOAL 1: Construct this prism in GeoGebra 3D & Test in AR

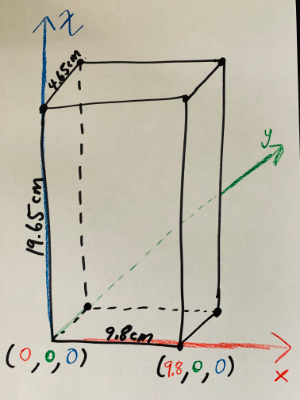
[size=150]The key with introducing students to modeling simple 3D solids is to choose an ideal position for one of its faces. And to do [i]this[/i], we need to choose convenient locations for 2 of the vertices. [br][br]Here's a general conversation I've had with many of my Ss in the past (re: this). [br][br][b]Me:[/b] "What's the easiest coordinate number to work with?" [br][b]Students:[/b] [Most reply either] "1" [or] "0". [br][b]Me:[/b] "Of those two, which is usually easier to work with?" [br][b]Students:[/b] "0". [br][b]Me:[/b] "Why"? [br][b]Students: [/b]"Makes doing algebra a lot easier".[br][br][b]Me:[/b] "Okay... well..., I want you to now build this prism in GeoGebra's 3D app [rectangular coordinate system that's shown] so that we maximize the number of times zero is used a coordinate." [br][br]And off they go. [br][br]There's 3 main ways students can position it so (0,0,0) is used as one corner (vertex). [br]One setup is shown below. [/size]
ONE POSSIBLE SETUP. What are the coordinates of its other 6 vertices?

Here's what this setup looks like after it's built in GeoGebra 3D
NOW TO EXPLORE IN AUGMENTED REALITY:
1) [size=150]Open up GeoGebra 3D app on your device. [br][br]2) Go to the MENU (horizontal bars) in the upper left corner. Select OPEN. [br] In the Search GeoGebra Resources input box, type [b][size=200]w34uzfby[/size][/b][br] (Note this is the resource ID = last 8 digits of the URL for this resource.)[br][br]3) Reposition this prism (if necessary) on your device. [br][br][/size]4) Tap the AR button (lower right). Hold your device to the floor. When the square appears, TAP it. [br] You can now explore this resource in Augmented Reality.
