Exploring Translations 1
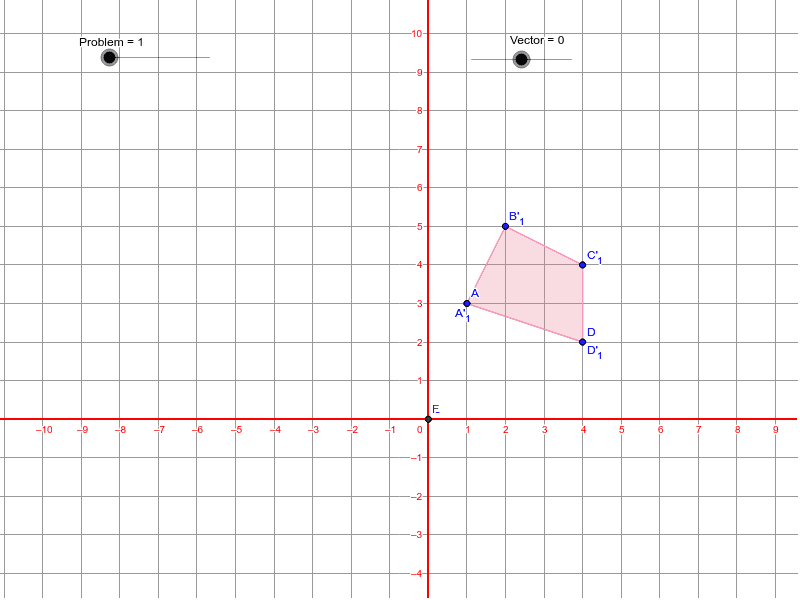
If this is your first time using Geogebra, you may want to go through a quick "[url=https://www.youtube.com/playlist?list=PLITakOESY-2wWt-BBDXC4ZzjO6jxcc3Sy]How to Use Geogebra[/url]" Tutorial. If you are my student, you probably won't need this, though you may watch the first video if you like.[br][br]Next, if you don't what what the different types of transformations are, do a web search and find out . Yup, open a new tab in your browser and [url=http://lmgtfy.com/?q=types+of+transformations&l=1]search for it[/url].[br][br]Before you start, try moving the slider (the black dot on a line directly under the word "vector") left or right. Don't worry about what a vector is for now (or [url=http://lmgtfy.com/?q=define+vector+math]google it if you must know[/url]); just have fun moving the slider. Seriously, have fun with it. Like, smile and stuff.[br][br]The brown shape doesn't move: this is called the preimage. The preimage is the shape that we will be translating (because it's "pre" translation). The pink shape is called the image, because it's the "image" of the preimage after transformation. Preimage = before transformation (brown), and image = after transformation (pink). Kapisch?
Question 1
a) Translate the polygon so that point A is at (5,3). How far did the polygon move from its [b]original position[/b]? [br]b) Now translate it so that point C is at (0,4). How far did the polygon move from [b]the last[/b] position? [br]c) Is this a horizontal or vertical translation?
[i]Check your answer, then [url=https://www.geogebra.org/book/title/id/2660003#material/2664627]go on to Exploring Translations 2.[/url][/i]
Exploring Reflections 1
You made it to reflections? Not bad.[br][br]Have you ever looked in a mirror and noticed a blemish on one side of your face, but that tricky mirror flips that blemish to the other side of your face? Try cutting your hair using a mirror sometime, that's really confusing. This is what happened when Blossom tried to do it:[br][br][img]http://i.imgur.com/y31m924.jpg[/img][br][br]Better learn your reflections well, or you could look like Blossom on a truly bad hair day.[br][br]Now take a look at the diagram below. You have a few more tools this time, but don't play around with those until the instructions tell you to.[br][br]The dotted line is of the form y=mx+b (slope intercept form), and the slope and y-intercept may be changed by using the sliders in the top right. Try playing around with the slope and y-intercept and notice what happens to the image (pink). If the image moves off your screen, use the move tool[icon]/images/ggb/toolbar/mode_translateview.png[/icon] or the zoom tools[icon]/images/ggb/toolbar/mode_zoomin.png[/icon] [icon]/images/ggb/toolbar/mode_zoomout.png[/icon] to get a better view. You may need to long click on the move tool to find the zoom tools.
Question 1
Hit the reset button in the top right corner (it looks like this [img]http://i.imgur.com/cCmT43v.png[/img]). Move the y-intercept so that the reflection image (that's the pink one that changes when you move the sliders) is "back to back" with the pre-image (the brown one). More specifically, place B' and B at the same point, and C' and C at the same point, but A' and A will be at different points.What is the formula for this line? If you don't remember how to find the equation for a line given a graph, use [url=http://lmgtfy.com/?q=find+the+formula+for+a+line+from+a+graph]this link[/url] to discover the secrets of line equation magic! (I would suggest the mathisfun website for this one)
Move on the Exploring Reflections 2.
Exploring Rotation 1
Question 1
Without moving the point of reflection, rotate the shape (using the angle of rotation slider) so that point A is at (-3,1). What angle did you rotate by? Was it a clockwise or counter clockwise rotation?
Question 2
Without moving the point of reflection, rotate the shape (using the angle of rotation slider) so that point A is at (-1,-3). What angle did you rotate by?[br][br]Now draw a circle using the circle with center through point [icon]/images/ggb/toolbar/mode_circle2.png[/icon] tool. First click on the center of rotation which is the point (0,0) (also called the origin), then click point A on the preimage (brown). Don't forget to change back to the select [icon]/images/ggb/toolbar/mode_move.png[/icon] tool before moving the slider.
As you rotate the figure (without moving the center of rotation) notice which points stay on the circle. Draw a new circle with center at the origin that passes through point B. Rotate the figure a bit. Do you see the pattern? Draw another circle with center at the origin and passing through a point on the preimage. Rotate the figure a bit. What is the pattern?
Question 3
As you rotate the figure (without moving the center of rotation) notice which points stay on the circle. Draw a new circle so with center at the origin that passes through point B. rotate the figure a bit. Do you see the pattern? Draw another circle with center at the origin and passing through a point on the preimage. Rotate the figure a bit. What is the pattern?
[i]Check your answers, redo any exercises that you missed, and then move on to [url=https://www.geogebra.org/book/title/id/2660003#material/2667031]Exploring Rotation 2[/url].[/i]
