Types of Triangles by Side and Angle v2
Learn how to design and develop a dynamic GeoGebra applet for teaching triangle classification. This guide covers the essential design decisions and practical GeoGebra tricks needed to build an effective, interactive learning tool from scratch.
Inhaltsverzeichnis
- An Interactive Journey into Triangles (For Students)
- Meet Your Triangle
- The Side Story (Equilateral, Isosceles, Scalene)
- An Angle on Things (Acute, Right, Obtuse)
- The Final Classification Challenge
- A Teacher's Guide to the Triangle Classifier (For Teachers)
- Activity 2.1: Lesson Plan - A Guided Discovery
- Activity 2.2: Key Discussion & Inquiry Questions
- Activity 2.3: Addressing Common Misconceptions
- Activity 2.4: Assessment and Extension Ideas
- Constructing the Applet from Scratch (For Developers)
- Constructing the Applet from Scratch (For Developers)
- Dynamic Text
Meet Your Triangle
Activity 1.1: Meet Your Triangle
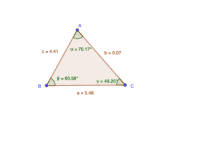
Welcome, Triangle Explorer! [br]Before we start classifying triangles, let's familiarize ourselves with the tool in front of us. This is your very own [b]interactive triangle[/b]. You can change its shape however you like.[b]Your First Task:[/b][list=1][*]Click and hold one of the corners (the points labeled [b]A[/b], [b]B[/b], or [b]C[/b]).[/*][*]Drag the point anywhere on the screen.[/*][/list][b]What to Watch For:[/b][list][*]As you move the vertices, look at the numbers next to the sides. You'll see their lengths change in real-time![/*][*]Also, notice the measurements inside the angles. They will grow and shrink as you reshape the triangle.[/*][/list]Go ahead and play around! Try to make a very tall, skinny triangle, and then a short, wide one. When you feel comfortable changing its shape, you're ready for the next activity.
What seems to be the connection between the length of a triangle's sides and the size of its angles?
Can you create a triangle where the shortest side is opposite the largest angle? Why or why not?
Activity 2.1: Lesson Plan - A Guided Discovery
[b]Activity 2.1: Lesson Plan - A Guided Discovery[/b][b]Description:[/b] This 45-minute lesson plan guides educators through using the Interactive Triangle Classifier applet to foster a student-led, discovery-based learning experience. The goal is for students to construct their own understanding of triangle classifications through hands-on exploration.[b]Lesson Details[/b][list][*][b]Topic:[/b] Classifying Triangles by Sides and Angles[/*][*][b]Grade Level:[/b] 6th - 8th Grade[/*][*][b]Time Allotment:[/b] 45 minutes[/*][*][b]Learning Objectives:[/b] By the end of this lesson, students will be able to:[list][*][b]Identify[/b] and [b]define[/b] triangle classifications by sides (equilateral, isosceles, scalene).[/*][*][b]Identify[/b] and [b]define[/b] triangle classifications by angles (acute, right, obtuse).[/*][*][b]Classify[/b] a triangle using both its side and angle attributes (e.g., "Right Isosceles").[/*][*][b]Justify[/b] why certain combinations of classifications (e.g., "Obtuse Equilateral") are impossible.[/*][/list][/*][*][b]Materials:[/b][list][*]GeoGebra Interactive Triangle Classifier applet[/*][*]Devices for students (tablets, Chromebooks, or computers)[/*][*]Projector or interactive whiteboard for demonstration[/*][*]Optional: A simple worksheet with the questions from Activities 1.2, 1.3, and 1.4.[/*][/list][/*][/list][b]Lesson Procedure[/b][b]1. Introduction & Hook (5 minutes)[/b][list][*]Start by asking the class: "What makes one triangle different from another?" Project the applet on the board and show a few very different-looking triangles (e.g., a long skinny one, a perfect-looking one).[/*][*]Introduce the day's goal: "Today, we're going to be detectives and discover the secret 'names' or 'classifications' that all triangles have. This tool will help us do it."[/*][*]Briefly demonstrate how to drag the vertices (A, B, C) and point out where to find the side and angle measurements, as covered in [url=https://www.geogebra.org/m/vmhhd5vj][b]Activity 1.1[/b][/url][b][/b].[/*][/list][b]2. Guided Exploration: The Side Story (10 minutes)[/b][list][*]Instruct students to open [url=https://www.geogebra.org/m/zfvycwdt][b]Activity 1.2[/b][/url][b][/b].[/*][*]Pose the challenge: "Your first mission is to build a triangle where all three side lengths are exactly the same. See if you can do it!" Give them a minute to try.[/*][*]Discuss the term [b]Equilateral[/b].[/*][*]Repeat the process for [b]Isosceles[/b] ("exactly two sides equal") and [b]Scalene[/b] ("no sides equal").[/*][*]Use the open-ended questions from Activity 1.2 to spark a brief class discussion. For instance, ask: "When you made your equilateral triangle, what did you notice about its angles?" This subtly previews the next topic.[/*][/list][b]3. Guided Exploration: An Angle on Things (10 minutes)[/b][list][*]Direct students to [url=https://www.geogebra.org/m/rmhxds7k][b]Activity 1.3[/b][/url][b][/b].[/*][*]Pose the next challenge: "Now, let's ignore the sides and focus only on the angles. Can you create a triangle with a perfect 90-degree angle, like the corner of a piece of paper?"[/*][*]Discuss the term [b]Right Triangle[/b].[/*][*]Repeat the process for [b]Acute[/b] ("all angles less than 90°") and [b]Obtuse[/b] ("one angle greater than 90°").[/*][*]Use a key question from Activity 1.3 to check for understanding: "Try to make a triangle with two obtuse angles. Can it be done? Why not?"[/*][/list][b]4. Synthesis & The Final Challenge (15 minutes)[/b][list][*]Explain that every triangle has two names. Give an example on the board: "This triangle is [b]Right[/b] (angle name) and [b]Scalene[/b] (side name)."[/*][*]Direct students to [url=https://www.geogebra.org/m/pcv3h9xc][b]Activity 1.4[/b][/url][b][/b] and present it as the "Final Boss Challenge."[/*][*]Task them to build the specific combinations listed (e.g., Right Scalene, Obtuse Isosceles).[/*][*]Circulate the room, providing support and asking probing questions.[/*][*]Bring the class together for a final discussion. Ask: "Were there any combinations you could [i]not[/i] build?" Use this to lead a conversation about why an [b]Obtuse Equilateral[/b] or [b]Right Equilateral[/b] triangle is impossible, referencing the fact that equilateral triangles always have 60° angles.[/*][/list][b]5. Wrap-Up & Exit Ticket (5 minutes)[/b][list][*]As an exit ticket, project a new triangle on the board using the applet.[/*][*]Ask students to write down its full classification (e.g., Acute Isosceles) on a slip of paper and explain how they know. This provides a quick formative assessment of their understanding.[/*][/list][b]Differentiation[/b][list][*][b]For Support:[/b][list][*]Encourage students to work in pairs.[/*][*]Provide a printed handout with definitions and diagrams of each triangle type.[/*][*]Focus on mastering one classification system (sides or angles) before combining them.[/*][/list][/*][*][b]For Extension:[/b][list][*]Challenge students to discover the [b]Triangle Inequality Theorem[/b] by trying to create a triangle where two short sides don't "reach" each other.[/*][*]Ask them to investigate the relationship between the longest side and the largest angle.[/*][/list][/*][/list]
Constructing the Applet from Scratch (For Developers)
This code creates a "snapping" effect that helps users easily construct a perfect equilateral triangle.[br][br]In simple terms, the code says: "If the user drags the vertex A very close to a pre-calculated perfect spot (A_1 or A_2), then automatically move A to that exact spot."
How It Works
This script runs continuously in the [code]OnUpdate [/code]tab for point [code]A[/code], meaning it checks the condition every time [code]A[/code] is moved.[list=1][*][b]The Target Points ([code]A_1[/code] and [code]A_2[/code]):[/b] Before writing this script, the developer would have created two hidden points, [code]A_1[/code] and [code]A_2[/code]. These points represent the [b]two mathematically perfect locations[/b] where vertex [code]A[/code] would form an equilateral triangle with the other two vertices (let's call them [code]B[/code] and [code]C[/code]).[/*][*][b]The Snapping Zone:[/b] The [code]Distance(A, A_1) < 0.2[/code] part creates an invisible "snapping zone" or radius around the target point [code]A_1[/code]. The number [b][code]0.2[/code][/b] is the [b]threshold[/b]; you can make it larger for a more accurate snap or smaller for greater precision.[/*][*][b]The Action:[/b][list][*][code]If(Distance(A, A_1) < 0.2, SetValue(A, A_1))[/code]: This line checks if the draggable point [code]A[/code] has entered the snapping zone around the first target point [code]A_1[/code]. If it has, the [b][code]SetValue(A, A_1)[/code][/b] command is executed, which instantly moves [code]A[/code] to the exact coordinates of [code]A_1[/code], creating a perfect equilateral triangle.[/*][*]The second line does the exact same thing for the other possible target point, [code]A_2[/code].[/*][/list][/*][/list]An analogy is to think of the perfect spots [code]A_1[/code] and [code]A_2[/code] as having small, invisible [b]magnets[/b]. When you drag the vertex [code]A[/code] close enough, it gets pulled in and [b]locks perfectly into place[/b].
How to Construct the Perfect Spots (A_1 and A_2)
There are a few ways to create these hidden target points. The most classic method uses intersecting circles:[list=1][*][b]First Circle:[/b] Select the Circle tool. Create a circle with its center at point [b]B[/b] and its radius extending to point [b]C[/b]. This ensures every point on this circle is the correct distance from B.[/*][*][b]Second Circle:[/b] Create another circle with its center at point [b]C[/b] and its radius extending to point [b]B[/b].[/*][*][b]Find the Intersections:[/b] The two points where these circles intersect ([code]A_1[/code] and [code]A_2[/code]) are the only two locations in the plane that are the correct distance from [i]both[/i] B and C to form an equilateral triangle.[/*][/list]Your idea of using a perpendicular bisector is a great start because it correctly identifies the line of symmetry for an isosceles triangle. To adapt it for an [b]equilateral[/b] triangle, the height must be precise. The height of an equilateral triangle with side length [code]s[/code] is [code](s √3) / 2[/code]. So, you would construct a circle on the perpendicular bisector with a radius of [code](length of base * √3) / 2[/code] to find the perfect spots. The two-circle method is often simpler to construct in GeoGebra.